 Help Center
Setting up Recur360 to sync with QuickBooks Desktop via the QuickBooks Web Connector
Recur360 syncs with QuickBooks Desktop via the QuickBooks Web Connector (QBWC).
Minimum Operating Requirements:
-
- You must be running QuickBooks Desktop for Windows Versions 2020 – 2022+ to be on a supported version of the Web Connector.
- Your Server or PCs where you will run the QBWC must be on Windows Server 2016/2019 or Windows 10/11.
- If your local environment doesn’t meet the above requirements, Recur360 can host QuickBooks Desktop for you in our Data Center on our Hosted Remote Desktop Servers.
Installation Prerequisites:
-
- The QBWC can only be configured to sync with Recur360 under one user’s Windows login / profile.
- This means that before you configure the QBWC you must decide on which Server Profile or PC Profile you will set it up under and then that person will be responsible for making sure the QBWC is launched and running each day in order for the sync to occur
Pre-Install:
-
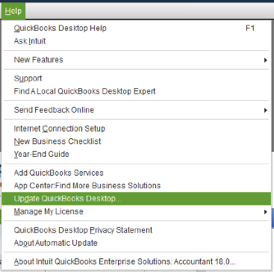
- Make sure that your QuickBooks version is on the latest patch. Inside of QuickBooks you can click on Help, Update QuickBooks and then process any updates
-
- Make sure you are on the latest version of the QBWC. To check, inside of QuickBooks click on File, Update Web Services

-
- You will see the version of the QBWC at the top of the window

-
- If you aren’t on the latest version please go to the next section on how to update to the latest version
Updating to the latest QBWC:
-
- Make sure you are logged into your PC or Server as a user with Administrative Rights
- Exit QuickBooks
- Open Windows Explorer (WIN+E)
- Browse to C:\Program Files (x86)\Common Files\Intuit\QuickBooks\ and rename the QBWebConnector sub folder to QBWebConnector_old

-
- Click on the following link to download the latest version and save it to your C:\Temp Directory (create the directory if it doesn’t exist)
- https://intuit.box.com/s/l2tztaei6qozxv8znbb0vpas01johpjj
- After downloading right click on the file and choose to Extract Files

-
- After Extracting right click on the QBWebConnectorInstaller.exe file and choose run as Administrator

-
- The installation will take 5 to 10 minutes to complete
Prior to configuring the QBWC:
-
- Launch QuickBooks and login to your Company Data File as the Admin user in Single User Mode
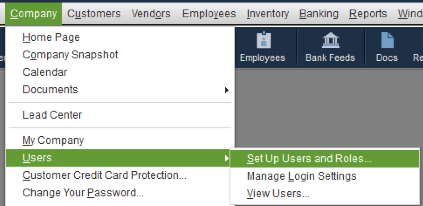
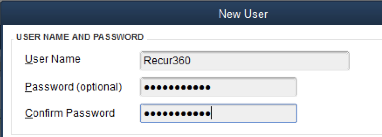
- Create a new QuickBooks user named Recur360 from within the Company drop down menu, Users, Set Up Users and Roles
-
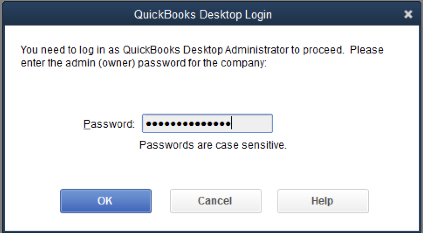
- Enter your Admin password for QuickBooks
-
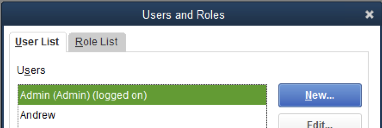
- Click New User and set a password
-
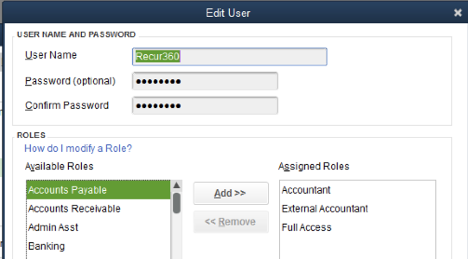
- If on QuickBooks Enterprise Assign the Roles Accountant, External Accountant and Full Access
-
- If on QuickBooks Pro or Premier, assign Full Access rights
- Click Close to leave the Users and Roles
Rebuild your QuickBooks Company File
- Make sure to run a Rebuild of your QuickBooks file before an initial sync with RECUR360.
- This ensures that there isn't any corruption in your data file.
- You may need to run a Rebuild twice if you find any errors the first time
- If you happen to run a Rebuild after an initial sync with RECUR360, the Rebuild will reset the modified date on all Customers, Invoices and Payment objects.
- This will cause the next QBWC sync to take considerably longer depending on the size of your database and how many years back your transactions go as we need to verify all transactions in RECUR360 match QuickBooks.
Connecting Recur360 to QuickBooks Desktop
-
- While logged into QuickBooks as the Admin in Single User mode, click on File, Update Web Services to launch the QBWC
- If you recently signed up for Recur360 click to Connect to QuickBooks Desktop.
- If you already had Recur360 connected to another PC, first remove Recur360 from the web connector on that computer.
- Then login to Recur360 go to Settings, Account Settings and click on "QuickBooks Desktop Steps" under Re-Download QuickBooks Web Connector

-
- The next screen will look like this:

-
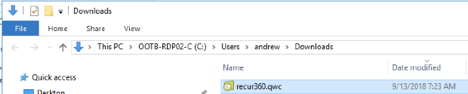
- Click on Option 3 to download the Recur360.qwc file

-
- This will automatically download into your Downloads folder or ask you where you want to save it
-
- Switch over to the QBWC and click to Add Application

-
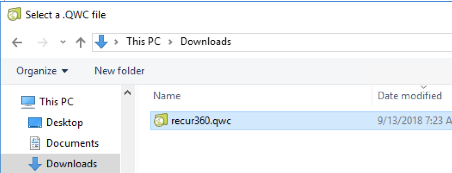
- Browse to your Downloads folder and select recur360.qwc
-
- In QuickBooks you will get the following pop-up windows, please click OK on Authorize New Web Service

-
- You will then get another pop-up window for the QuickBooks Application Certificate.

-
- Click the option to "Yes, always; allow access ..."
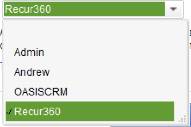
- Change the Login As from Admin to the Recur360 user you created
-
- Click Continue and OK to any other prompts
- Back in Recur360 copy and generate a Password from Step 7 into the Password box in the QBWC. If you don’t see a pre-defined password in Step 7 then enter in the password you used when creating your Recur360 account


-
- Click Yes to save the Password

-
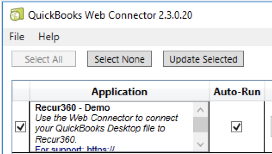
- Click the Check box on the left and then click on Updated Selected to start your initial Sync
-
- The initial sync may take some time depending on the size of your QuickBooks file, the number of Customers, Items, or the quantity of Open or Historical Invoices that we sync over

-
- While it is Syncing you can continue into Recur360 to finish setting up your Preferences
- You can view Sync Progress in the QuickBooks Sync Status in the Left Panel of Recur360

If you are re-installing or moving the QuickBooks Web Connector, please follow this tutorial:
https://learn.recur360.com/moving-the-QuickBooks-web-connector/
If you get the QBWC1039 Error, please follow this link to reset the application ID:
https://learn.recur360.com/error-qbwc1039-there-was-a-problem-adding-the-application/