 Help Center
QuickBooks Desktop - NSF - Returned Checks/ACH Transactions - Manual Process
When a customers ACH transaction gets returned by the bank (NSF) the payment needs to be removed from the invoice so it will show in the collection center to be processed for new payment.
-
- It is important not to edit the payment that was originally tied to the invoice because it may have been in a prior accounting period.
- Recur360 has an automation process to handle this through our NSF Automations and Deposit Automations.
- Contact our support to have us help setup this for you.
Recur360's Method
There are multiple ways to record the bounced/NSF check/ACH from a customer.
-
- Our automations go through the process of creating a seperate invoice tied to a clearing account, moving the payment to that invoice leaving the original invoice open to take the payment.
- If you would like to manually record the NSF/Bounce in this manner there are a few things that would need to be set up in QuickBooks first.
One Time Setup in QuickBooks Destop
NSF Clearing Account
If you do not have an NSF clearing account set up, you will want to start there. In QuickBooks Desktop click Lists- Chart of accounts.

-
- Click the arrow next to 'Account' in the bottom left and select 'New' at the top of the menu.

-
- Click the radial next to Bank, then select continue.

-
- Put in the account name and make sure the account type says 'Bank'. Then select save and close.

QuickBooks Items
To finish setting this up you will need 2 new parts in your QuickBooks Item list:
-
- Click Lists- Item lists

-
- Click the arrow next to 'Item' at the bottom left of the screen.

-
- In QuickBooks the first product/service is an NSF Invoice item. Make sure to check the 'Type' then enter a name for the item. Also make sure the account at the bottom is the clearing account created. Click 'OK' to save.

Note: The NSF Return item should NOT be linked to a Sales income account - this item will be used to invoice for the return and should be linked to a "Bank" type GL account (above you see it is linked to an NSF Clearing Account). This way you can track the balance in the NSF Clearing account and zero the GL account back out when Recur360 records the payment being deducted from your bank deposit.
-
- In QuickBooks the second product/service item is the NSF fee.

-
- If you just created these items in QuickBooks, you will need to Sync Data in Recur360 so they will be available to select. Run the Web Connector to sync the data.


Create the NSF Invoice
This can be done in QuickBooks or Recur360 after the web connector is run to sync the clearing account and items.
To create it in Recur360 create a new invoice for the customer and for the item select your newly created item.

-
- Remember to make the amount the amount of the bounced/NSF check/ACH.
Move the Payment
In order for the original invoice to be made "open" to receive a new payment you will want to open the payment in QuickBooks and move it to the NSF invoice you just created.
If you do not see that invoice and it was created in QuickBooks, click process transactions in the top right of Recur360, then run the web connector.
-
- Once the payment is attached to the new NSF invoice the original invoice is ready for a new payment.
-
- We also recomend setting up the automations since you will already be halfway done after these steps.
QuickBooks Desktop Methods
Learn how to record bounced or NSF checks from customers in QuickBooks Desktop.
-
- You can record NSF or bounced checks from customers with the Record Bounced Check feature, or by manual process.
- QuickBooks ensures that all related details on bounced check transactions are addressed to keep your account balanced and well-documented.
- Important: Record Bounced Check feature can only be used in single-user mode and only applies to check payments done through the Customer Payment window.
- If you have a returned ACH item, switch the payment type to Check before proceeding with the steps.
- If the payment method is grayed out or you’re unable to follow the steps proceed to Option 2.
Option 1: Use the Record Bounced Check feature
- From the Customers menu select Customer Center.
- Select Transactions tab, then choose Received Payments.
- Double-click the payment you want to record as NSF.
- On the receive payments window, select the Record Bounced Check icon on the Main ribbon tab. Note: The check must not be waiting to be cleared in the Undeposited Funds account, as it would have to have cleared the bank in order to bounce.
- In the Manage Bounced Check window, enter the following information, then select Next. Note: All these fields are optional. You can leave them blank if there weren’t any additional charges from the bank or if you don’t want to charge your customer for it.
- Bank Fee and Date
- Expense Account for the Bank Fee
- Class
- Customer Fee (how much you will charge the customer)
- QuickBooks will show you the Bounced Check Summary, for you to know what will happen behind the scenes. For example, you may see:
- The following invoices will be marked unpaid
- The following fees will be deducted from your bank account.
- This invoice will be created for the fee you want to charge your customer.
- Select Finish.
Option 2: Manually record bounced check
- Create an item and income account for tracking bounced checks and their associates charges. Important: This only needs to be set up once, if you've done this before, proceed to step 2.
- Type: Income Account
- Account Name: Bounced Checks Income
- Create Bad Check Charge item:
- Type: Other Charge
- Item Name: Bad Check Charge
- Amount or %: Leave it at 0.00
- Tax Code: Non-taxable
- Account: Select Bounced Checks Income (created in step a).
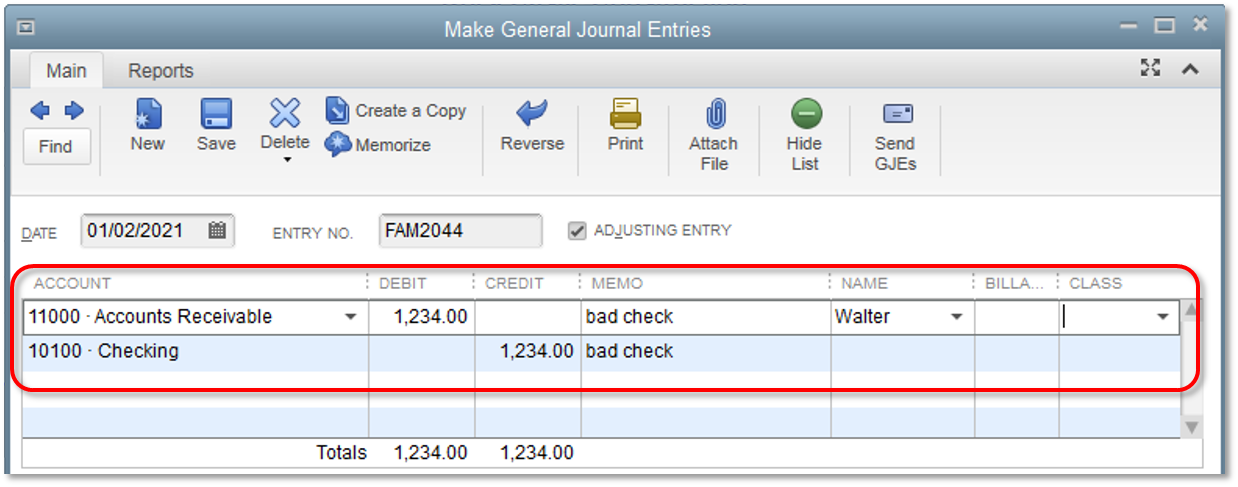
- Create a journal entry to reverse the original payment.
- From the Company menu, select Make General Journal Entries.
- In the General Entries window, debit your account receivables for the same amount of the NSF check.
- Enter a note in the Memo column describing the transaction. Example: Bounced check #123 - NSF
- Select the name of the customer or job associated with the NSF check, under the Name column.
- Credit the checking or bank account that received the original deposit.
- Select Save & Close.
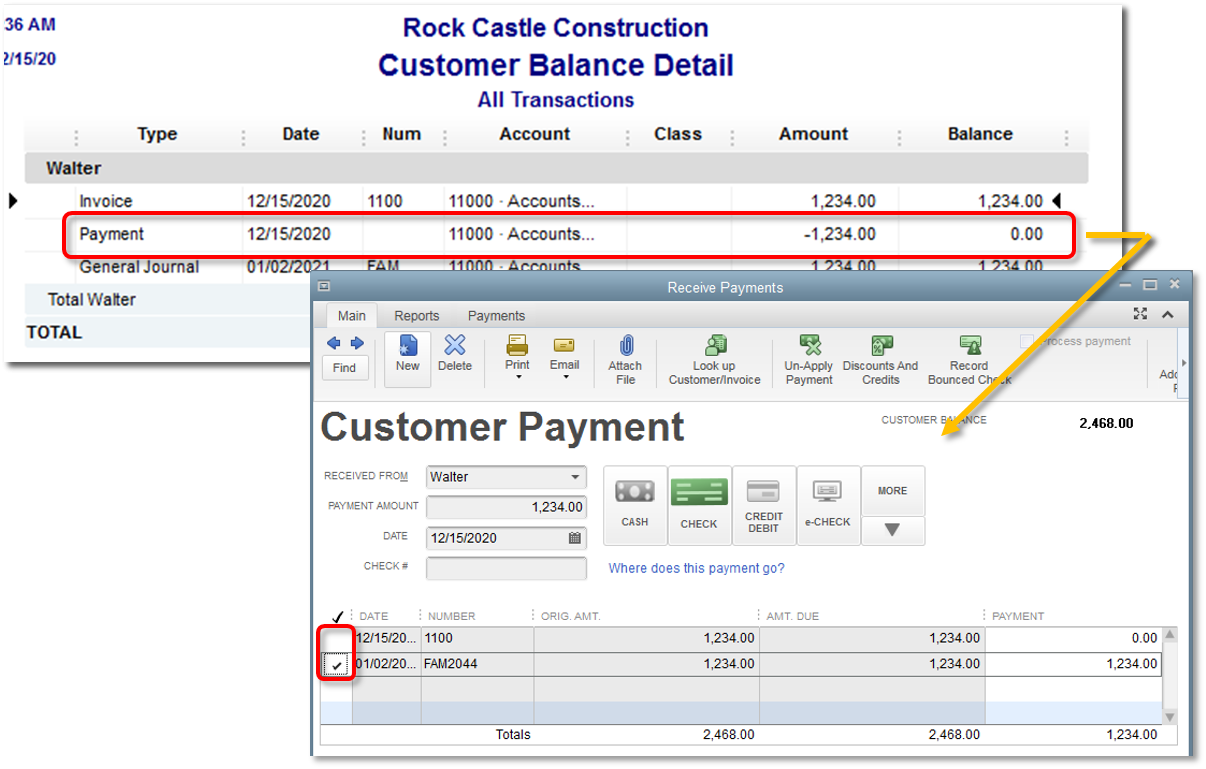
- Switch the payment for the invoice to the reversing journal entry.
- From the Reports menu, select Customers Receivables, then choose Customer Balance Detail.
- Double-click the original payment line for the NSF transaction.
- In the Receive Payments window, move the check mark from the invoice to the reversing journal entry.
- Select Save & Close.
Important: This will reduce your bank account by the amount of the bounced check. The invoice where the bounced check came from will be marked unpaid.
- (Optional) Resend open invoice
- Go to the invoice where the bounced check originated.
- Add the item Bad Check Charge (created in step 1). Note: You can skip this step if there weren't any additional charges from the bank or if you don't want to charge your customer for it.
- Select the Email icon on the Main ribbon tab, then choose Send.